
Blog security overview

Agenda
- GeoIP DenyList (MaxMind, Tor, Individual IP ,etc.)
- Attack Surface Reduction
- Resource & Noise Reduction
- Intrusion Detection (Suricata)
- Deep Packet Inspection (DPI) & Threat Response
- Suricata Enabled Rulesets
- abuse.ch Rulesets (Feodo Tracker, ThreatFox, URLhaus)
- Emerging Threats (ET) Rulesets
- OPNsense Firewall
- Port forwarding strategy
- NGINX Ingress
- Bypassing Kubernetes internal NAT for Real IP visibility (
hostNetwork: true)
- Bypassing Kubernetes internal NAT for Real IP visibility (
- NGINX ModSecurity WAF
- The "Golden" Helm Configuration
- Locking down ghost admin api to private local and VPN CIDRs
- Resource Protection & DoS Prevention settings
- Traffic Integrity & Encryption (
ssl-redirect) - Timeout Management
- Routing & Request Header Control
- Network Segmentation (
ingress.class) - Security Headers & Host Header Injection Prevention
- Network Segmentation (
- Ghost SMTP Signup Security
- Custom Python Denylist script
- Blocking disposable email domains
- SSL Certificates
- cert-manager & Let's Encrypt integration
- DNS-01 Challenge & Automated Renewals
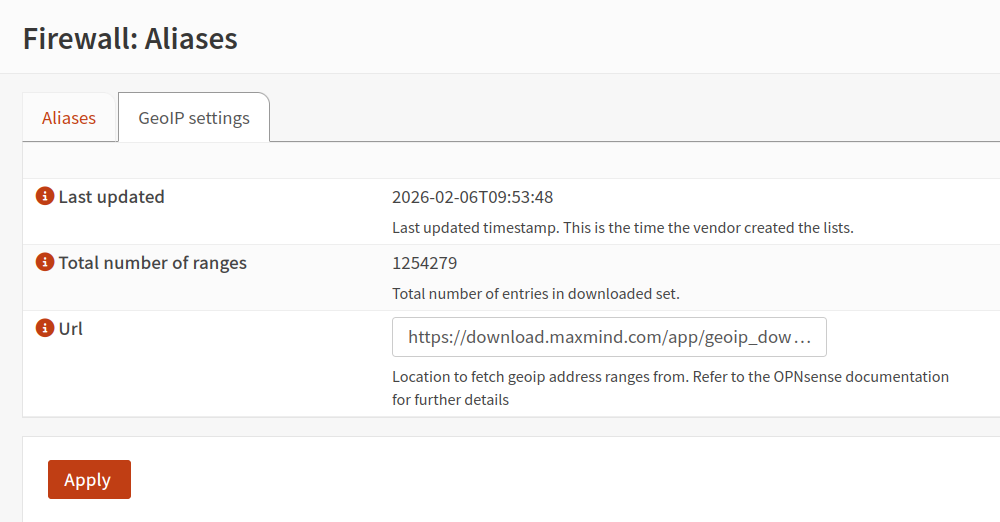
GeoIP DenyList - MaxMind GeoIP, Tor, Individual DenyList
Security is about reducing the attack surface. By using a GeoIP denylist, I'm essentially closing off network paths that I know I don't need. It’s a proactive way to mitigate brute-force attacks and vulnerability probing before they even hit my NGINX Ingress. If you’re trying to access the site from a blocked region and have a legitimate reason to be here, feel free to reach out via my socials.
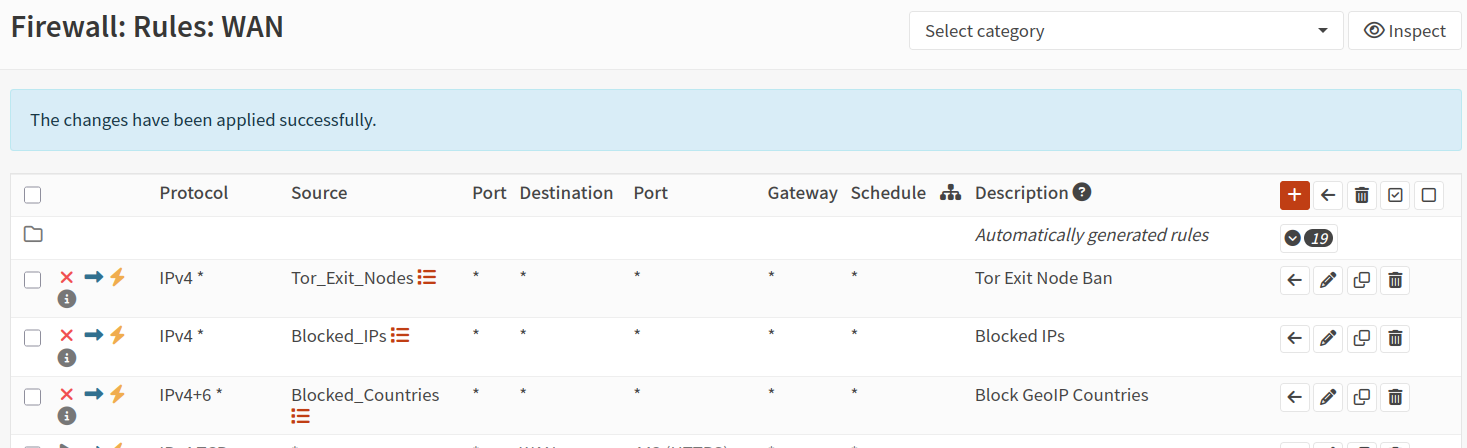
I created an alias and firewall rule which explicitly bans all Tor exit node traffic from accessing my site in any way. This prevents individuals from attempting to hack my system outside of IP monitoring. OPNsense supports this through aliases and using a tor exit node url which gets updated frequently and automatically. Most of these hacks are pretty pathetic but I don't want this noise in my logs.
https://check.torproject.org/torbulkexitlist
I also maintain an IP blocklist which I will soon have integrated with OPNsense alias Block_IPs and automated hacker reporting to authorities. So feel free to try and hack me. I do enjoy it.
Key points:
- Attack Surface Reduction: Making the "target" smaller.
- Resource Management: Not wasting CPU/RAM on bots.
- Noise Reduction: Keeping logs clean so you can see actual issues.

Trust but verify. Just kidding. Never trust anything always verify. I used this site to confirm implementation success.
To be perfectly honest here MaxMind has some major missing CIDR ranges for traffic coming from countries I have banned. I might create my own list or look for better "free" alternatives. MaxMind and others have paid lists I might look at when at scale. I think every hacker that tries to run some hacking software against my systems an immediate ban and automatically adding to an alias IP banlist should work out fine I think. As long as the list doesn't get too long.

I used this site to confirm denial across many of the countries I currently block
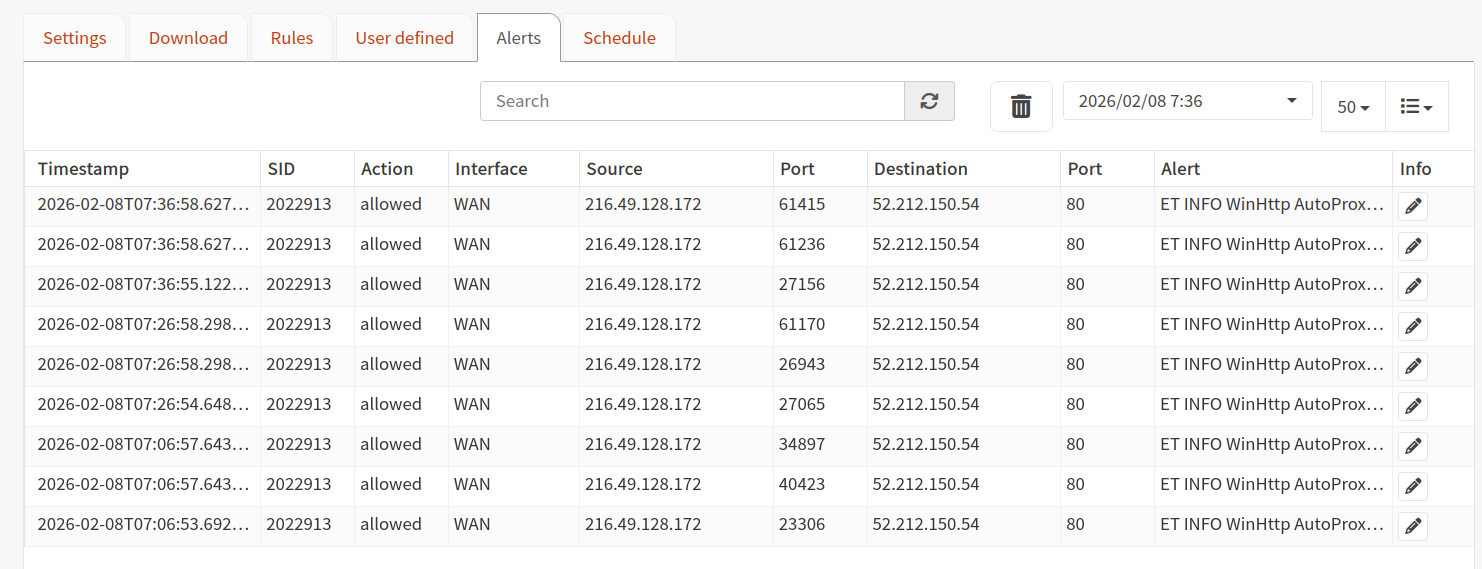
Intrusion Detection - Suricata
Implementing Suricata as part of my stack is about moving from passive logging to active network defense. While standard firewalls handle basic access control, Suricata provides Deep Packet Inspection (DPI), allowing me to see exactly what is happening inside the traffic.
I use it for a few specific reasons:
- Intrusion Detection & Prevention: It analyzes every packet against a massive library of known signatures (like the Emerging Threats and abuse.ch rulesets). If a request matches a pattern for a known exploit or a malware "phone home" signal, Suricata identifies it in real-time.
- Protocol Analysis: Beyond just looking at ports, it understands protocols. It can see if an attacker is trying to hide malicious commands inside legitimate-looking HTTP or TLS traffic.
- Visibility into Lateral Movement: It’s not just about the front door. Suricata helps monitor internal traffic, which is crucial for identifying if a single compromised service is attempting to scan or infect other parts of my network.
- Automatic Threat Response: By integrating it with my firewall, I can move from just "detecting" to "blocking"—automatically dropping traffic from IPs that exhibit confirmed malicious behavior.
Ultimately, it gives me a "security camera" for my network traffic, providing the forensic data I need to understand how an attack was attempted and the automated tools to stop it before it reaches my data.
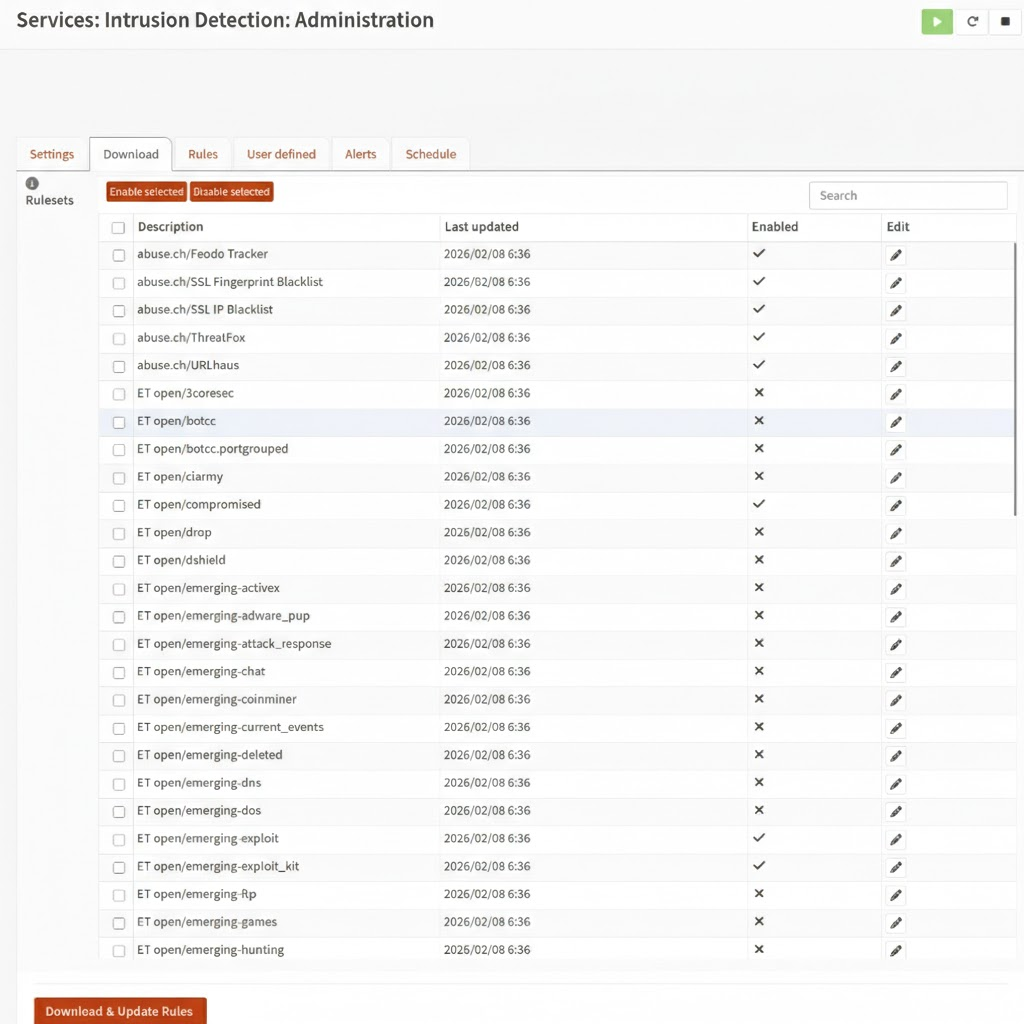
Suricata Enabled Rulesets

The following is just an example of the rules you would at least want to use when hosting a web server.
abuse.ch Rulesets
These are highly specific feeds from a trusted Swiss security project.
- Feodo Tracker: Targets botnet infrastructure associated with the Feodo (Dridex/Emotet) family.
- SSL Fingerprint Blacklist: Blocks malicious SSL/TLS handshakes based on specific "JA3" fingerprints used by malware.
- SSL IP Blacklist: Blocks IP addresses associated with malicious SSL certificates.
- ThreatFox: A multi-layered feed of "Indicators of Compromise" (IOCs) including malware C2s and payloads.
- URLhaus: Targets URLs used for malware distribution and payload hosting.
Emerging Threats (ET) Rulesets
These are broader categories from Proofpoint’s Emerging Threats community feed.
- open/compromised: A list of known compromised hosts and "bad" IP reputations.
- emerging-exploit: Detects active attempts to exploit known software vulnerabilities (CVEs).
- emerging-exploit_kit: Specifically targets traffic patterns of "Exploit Kits" (automated toolkits used to infect users via browsers).
- emerging-ja3: Identifies malicious software by its unique SSL/TLS "fingerprint" (the specific combination of cryptographic settings used in the handshake), allowing the IPS to detect and block tools like malware or botnets even inside encrypted traffic without needing decryption.
- emerging-malware: Detects the "phone home" or C2 traffic of active malware infections.
- emerging-mobile_malware: Focuses on threats targeting Android and iOS devices.
- emerging-scan: Identifies reconnaissance activity, such as port scanners and vulnerability mappers.
- emerging-user_agents: Flags suspicious or malicious "User-Agent" strings (e.g., a browser identifying itself as a known hacking tool).
- emerging-web_server: Protects web servers from inbound attacks like SQL injection or path traversal.
- emerging-web_specific_apps: Targeted rules for vulnerabilities in specific CMS/apps like WordPress, Joomla, or Drupal.
- emerging-worm: Detects self-propagating malware that attempts to spread across a network.
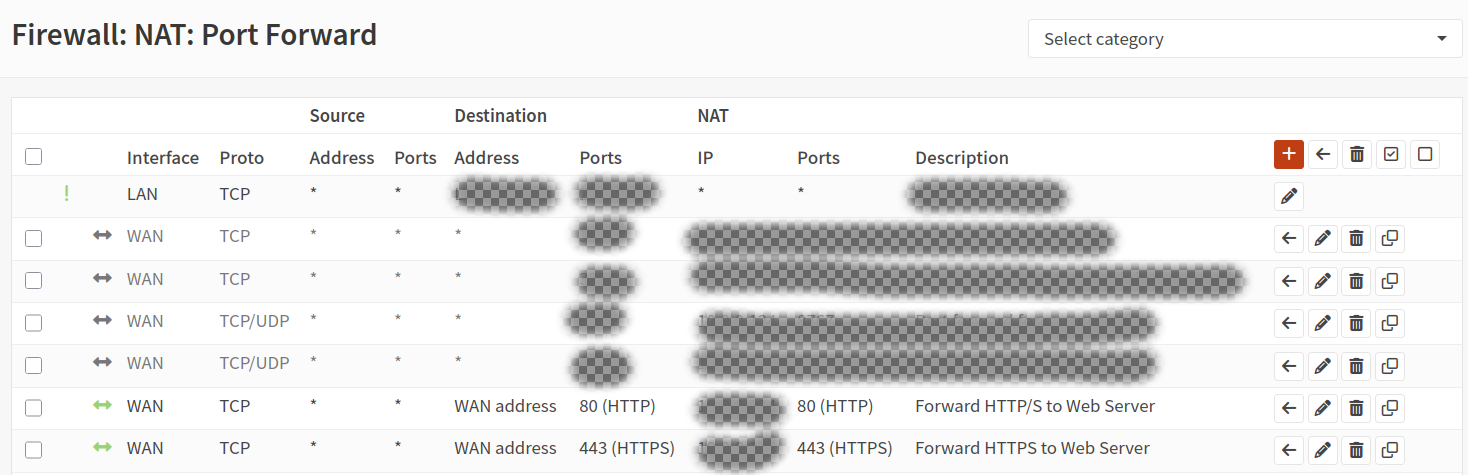
OPNsense Firewall
- 80/443 port forwarded to "external" ingress-nginx
NGINX Ingress
I patched my Ingress to bypass Kubernetes' internal NAT.
By default, the container overlay network rewrites packet headers (Source NAT) to route traffic, which unfortunately scrubs the attacker's true IP address and replaces it with the internal gateway IP in my logs.
By setting hostNetwork: true, I am forcing the Ingress controller to bind directly to the bare-metal network interface. This lets it see the raw, unadulterated traffic—real Source IPs included—before the overlay network can mask them. The dnsPolicyline is just the necessary glue; it forces the pod to keep using internal Cluster DNS for service discovery (like finding my Ghost blog) even though it's effectively living 'outside' on the host network.
This stops scanning or hacks which attempt to hide their real ip:
curl -H "X-Forwarded-For: 127.0.0.1" https://www.fracturedarchitecture.com/.env
- X-Forwarded-For: "$remote_addr"
- X-Real-IP: "$remote_addr"
- X-Forwarded-Host:"www.fracturedarchitecture.com"
- X-Forwarded-Proto: "https"
Note: Setting hostNetwork: true gives the Ingress pod access to the node's loopback device and network interfaces. In a multi-tenant cluster, this is a security risk. Since this is a single-tenant private cluster, the visibility into Real Client IPs outweighs the isolation risk.
NGINX ModSecurity WAF
Securing Kubernetes with NGINX & ModSecurity (The Right Way)
I recently hardened my Kubernetes cluster by deploying the NGINX Ingress Controller with the ModSecurity WAF enabled. My goal was simple: get the full protection of the OWASP Core Rule Set (CRS) to block SQL injection and XSS attacks, while keeping the flexibility to whitelist my specific apps like Ghost. This is basically another layer of highly specialized Intrusion Prevention System (IPS) for Layer 7 (HTTP/HTTPS). OPNsense handles Deep Packet Inspection and ModSecurity handles Deep Request Inspection since ingress-nginx is the first layer that sees the real decrypted traffic. nginx is the TLS termination point in the cluster.
Getting it to work wasn't just a toggle switch. I had to solve for Real IP visibility (using hostNetwork: true)
Here is the "Golden Configuration" that finally got everything working—stable, secure, and logging attacks in clean JSON format.
The Winning Helm Configuration
controller:
  # 1. Network Performance & Real IPs
  hostNetwork: true
  dnsPolicy: ClusterFirstWithHostNet

  # 2. WAF Configuration
  config:
    enable-modsecurity: "true"
    enable-owasp-core-rules: "true"
    allow-snippet-annotations: "true"

    modsecurity-snippet: |
      # Phase logic exception
      Include /etc/nginx/owasp-modsecurity-crs/plugins/ghost-rules.conf

      # Enable Active Blocking (Not just detection)
      SecRuleEngine On
      SecRequestBodyAccess On
      SecRequestBodyLimitAction Reject

      # JSON Logging to Stdout (for easy parsing)
      SecAuditLog /dev/stdout
      SecAuditLogFormat JSON
      SecAuditEngine RelevantOnly

  # 3. Mount the Custom Rules
  extraVolumes:
    - name: custom-rules
      configMap:
        name: customizations
  extraVolumeMounts:
    - name: custom-rules
      mountPath: /etc/nginx/owasp-modsecurity-crs/plugins
Example helm chart values.yaml for a secure deployment of ingress-nginx
Ghost Specific WAF Rules
I locked down the ghost admin endpoints to my specific internal CIDRs and VPN CIDRs. This further enhances security preventing even the attempt at hacking my blog from outside of a network I control. Essentially the only accessible resources will be the ones that need to be publicly available. So if the ghost admin api contains a critical bug at any point the only one who can exploit it is users on my network. This could also be done with ingress routes but I decided to use the WAF instead.
apiVersion: v1
kind: ConfigMap
metadata:
  name: customizations
  namespace: ingress-nginx-external
data:
  empty-after.conf: ""
  empty-before.conf: ""
  empty-config.conf: ""

  ghost-rules.conf: |
    # ==========================================================
    # GHOST WAF MASTER CONFIGURATION
    # ==========================================================

    # --- PHASE 1: GLOBAL BLOCKLIST (Bad Traffic) ---

    # 1. Block WordPress Scanners (Noise reduction)
    SecRule REQUEST_URI "@beginsWith /wp-" \
      "id:10001,phase:1,deny,status:444,msg:'Blocked WordPress Scanner',logdata:'%{MATCHED_VAR}'"

    # 2. Block Sensitive System Files
    SecRule REQUEST_URI "@rx \.(?:env|git|svn|htaccess|docker|yml|yaml)$" \
      "id:10002,phase:1,deny,status:403,msg:'Attempted Access to Sensitive File'"


    # --- PHASE 2: PUBLIC ALLOWLIST (The "Safe Zones") ---
    # These rules allow traffic to bypass the custom Admin Block (Rule 10004).
    # We keep 'ctl:ruleEngine=On' so OWASP Core Rules still scan for attacks (XSS/SQLi).

    # 3. Allow Public Content API (Theme Data)
    SecRule REQUEST_URI "@beginsWith /ghost/api/content/" \
      "id:10003,phase:1,allow,nolog,ctl:ruleEngine=On"

    # 4. Allow Ghost Assets (Fonts/Scripts)
    SecRule REQUEST_URI "@beginsWith /ghost/assets/" \
      "id:10006,phase:1,allow,nolog,ctl:ruleEngine=On"

    # 5. Allow Member Interaction (Login, Logout, Comments, Webhooks)
    # This covers:
    #   - /members/api/session/ (Login/Logout)
    #   - /members/api/send-magic-link/ (Signup)
    #   - /members/api/comments/ (Posting Comments)
    #   - /members/webhooks/ (Stripe/Mailgun)
    SecRule REQUEST_URI "@beginsWith /members/" \
      "id:10007,phase:1,allow,nolog,ctl:ruleEngine=On"


    # --- PHASE 3: ADMIN LOCKDOWN (The "Vault") ---

    # 6. Bypass WAF for Authorized Admin (YOU)
    # If it is the Admin URL AND your IP -> Allow & Disable Engine (No false positives).
    SecRule REQUEST_URI "@beginsWith /ghost/" \
      "id:10005,phase:1,allow,nolog,ctl:ruleEngine=Off,chain"
      SecRule REMOTE_ADDR "@ipMatch 10.0.0.0/8,192.168.0.0/16"

    # 7. Block Everyone Else from Admin
    # If we reached this point, it is a /ghost/ request from a Stranger.
    SecRule REQUEST_URI "@beginsWith /ghost/" \
      "id:10004,phase:1,deny,status:403,msg:'Blocked External Admin Access'"
Lock down ghost admin endpoint to only internal and vpn CIDRs
Handling False Positives (The Ghost Admin Fix)
Ghost's admin API sends complex JSON payloads containing HTML and code snippets. This triggers multiple WAF rules and skyrockets the **Anomaly Score**, causing a block even if you whitelist individual rules.
One alternative way to fix this is to completely disable the WAF engine for the Admin API path (`/ghost/api/`), relying on Ghost's built-in authentication instead. I chose to secure the admin endpoint to my internal network CIDRs. This approach is better but only if you can guarantee source IP address.
apiVersion: v1
kind: ConfigMap
metadata:
  name: customizations
  namespace: ingress-nginx-external
data:
  ghost-rules.conf: |
    # 1. BLOCK NOISE (WordPress Bots)
    SecRule REQUEST_URI "@beginsWith /wp-" \
      "id:10001,phase:1,deny,status:444,msg:'Blocked WordPress Scanner'"

    # 2. ALLOW GHOST ADMIN (The Critical Fix)
    # The Admin API (/ghost/api/) sends content that looks like attacks.
    # We must disable the engine for this path to prevent the Anomaly Score from blocking valid saves.
    SecRule REQUEST_URI "@beginsWith /ghost/api/" \
      "id:10005,\
      phase:1,\
      pass,\
      nolog,\
      ctl:ruleEngine=Off"
customize the ingress-nginx for your waf requirements
If you're curious to learn more about how to configure this visit the link below.
Here is an example of what I log in case you are curious.
Click here to view the full WAF Log (JSON)
    2026/02/08 17:26:52 [error] 2237#2237: *74615 [client [CLIENT_IP]] ModSecurity: Access denied with code 403 (phase 2). Matched "Operator `Ge' with parameter `5' against variable `TX:BLOCKING_INBOUND_ANOMALY_SCORE' (Value: `5' ) [file "/etc/nginx/owasp-modsecurity-crs/rules/REQUEST-949-BLOCKING-EVALUATION.conf"] [line "222"] [id "949110"] [rev ""] [msg "Inbound Anomaly Score Exceeded (Total Score: 5)"] [data ""] [severity "0"] [ver "OWASP_CRS/4.22.0"] [maturity "0"] [accuracy "0"] [tag "anomaly-evaluation"] [tag "OWASP_CRS"] [hostname "www.fracturedarchitecture.com"] [uri "/"] [unique_id "177057161231.410939"] [ref ""], client: [CLIENT_IP], server: www.fracturedarchitecture.com, request: "HEAD /?id=1%20OR%201=1 HTTP/2.0", host: "www.fracturedarchitecture.com"

[CLIENT_IP] - - [08/Feb/2026:17:26:52 +0000] "HEAD /?id=1%20OR%201=1 HTTP/2.0" 403 0 "-" "curl/8.17.0" 52 0.000 [ghost-ghost-service-80] [] - - - - a1b6c18e889ab20873ba9e00b3db1a39

{
  "transaction": {
    "client_ip": "[CLIENT_IP]",
    "time_stamp": "Sun Feb  8 17:26:52 2026",
    "server_id": "362463011dcabb932b94eadad106437b4d90e1c3",
    "client_port": 60712,
    "host_ip": "[NODE_IP]",
    "host_port": 443,
    "unique_id": "177057161231.410939",
    "request": {
      "method": "HEAD",
      "http_version": 2.0,
      "uri": "/?id=1%20OR%201=1",
      "body": "",
      "headers": {
        "host": "www.fracturedarchitecture.com",
        "user-agent": "curl/8.17.0",
        "accept": "*/*"
      }
    },
    "response": {
      "http_code": 403,
      "headers": {
        "Server": "",
        "Date": "Sun, 08 Feb 2026 17:26:52 GMT",
        "Content-Length": "146",
        "Content-Type": "text/html",
        "Connection": "close",
        "Strict-Transport-Security": "max-age=31536000; includeSubDomains"
      }
    },
    "producer": {
      "modsecurity": "ModSecurity v3.0.14 (Linux)",
      "connector": "ModSecurity-nginx v1.0.4",
      "secrules_engine": "Enabled",
      "components": [
        "OWASP_CRS/4.22.0\""
      ]
    },
    "messages": [
      {
        "message": "SQL Injection Attack Detected via libinjection",
        "details": {
          "match": "detected SQLi using libinjection.",
          "reference": "v10,8",
          "ruleId": "942100",
          "file": "/etc/nginx/owasp-modsecurity-crs/rules/REQUEST-942-APPLICATION-ATTACK-SQLI.conf",
          "lineNumber": "46",
          "data": "Matched Data: 1&1 found within ARGS:id: 1 OR 1=1",
          "severity": "2",
          "ver": "OWASP_CRS/4.22.0",
          "rev": "",
          "tags": [
            "application-multi",
            "language-multi",
            "platform-multi",
            "attack-sqli",
            "paranoia-level/1",
            "OWASP_CRS",
            "OWASP_CRS/ATTACK-SQLI",
            "capec/1000/152/248/66"
          ],
          "maturity": "0",
          "accuracy": "0"
        }
      },
      {
        "message": "Inbound Anomaly Score Exceeded (Total Score: 5)",
        "details": {
          "match": "Matched \"Operator `Ge' with parameter `5' against variable `TX:BLOCKING_INBOUND_ANOMALY_SCORE' (Value: `5' )",
          "reference": "",
          "ruleId": "949110",
          "file": "/etc/nginx/owasp-modsecurity-crs/rules/REQUEST-949-BLOCKING-EVALUATION.conf",
          "lineNumber": "222",
          "data": "",
          "severity": "0",
          "ver": "OWASP_CRS/4.22.0",
          "rev": "",
          "tags": [
            "anomaly-evaluation",
            "OWASP_CRS"
          ],
          "maturity": "0",
          "accuracy": "0"
        }
      }
    ]
  }
}
Resource Protection & DoS Prevention
nginx.ingress.kubernetes.io/proxy-body-size: "10m"
nginx.ingress.kubernetes.io/ssl-redirect: "true"
kubernetes.io/ingress.class: "external-nginx"
nginx.ingress.kubernetes.io/proxy-set-headers: "ghost/ghost-custom-headers"
nginx.ingress.kubernetes.io/proxy-host: "www.fracturedarchitecture.com"
nginx.ingress.kubernetes.io/limit-rps: "20"
nginx.ingress.kubernetes.io/limit-burst-multiplier: "5"
nginx.ingress.kubernetes.io/limit-connections: "20"
nginx.ingress.kubernetes.io/proxy-read-timeout: "10"
nginx.ingress.kubernetes.io/proxy-send-timeout: "10"
customize your nginx ingress configuration for rate limiting etc.
These settings prevent attackers from exhausting your server's memory, CPU, or connection slots.
proxy-body-size: "10m": Limits the maximum allowed size of the client request body.- Security Reason: Prevents Denial of Service (DoS) attacks where an attacker sends massive files to fill up disk space or exhaust memory buffers.
limit-rps: "20": Restricts the number of requests per second from a single IP.- Security Reason: Mitigates brute-force attacks and application-layer DoS. It ensures one malicious actor cannot monopolize the ingress controller.
limit-burst-multiplier: "5": Allows a temporary "burst" of traffic above the RPS limit (in this case, up to 100 requests).- Security Reason: Smoothes out legitimate traffic spikes while still providing a hard ceiling to prevent sustained flooding.
limit-connections: "20": Limits the number of concurrent connections from a single IP address.- Security Reason: Protects against Slowloris style attacks, where an attacker opens many connections and keeps them open as long as possible to exhaust the server's connection pool.
Traffic Integrity & Encryption
ssl-redirect: "true": Automatically redirects HTTP traffic to HTTPS (Port 80 to 443).- Security Reason: Ensures encryption in transit. It prevents "Man-in-the-Middle" (MitM) attacks where sensitive data (like login cookies) could be intercepted over unencrypted connections.
Timeout Management
proxy-read-timeout: "10"&proxy-send-timeout: "10": Sets the maximum time (in seconds) for NGINX to wait for a response from the backend or send a request to it.- Security Reason: Aggressive timeouts prevent Resource Exhaustion. Without these, "hanging" backend connections can stay open indefinitely, eventually causing the Ingress controller to run out of worker processes and stop accepting new traffic.
Routing & Request Header Control
ingress.class: "external-nginx": Specifies which Ingress controller should handle this configuration.- Security Reason: Network Segmentation. This ensures that internal/sensitive services aren't accidentally exposed on an internet-facing Ingress controller.
proxy-set-headers: "ghost/ghost-custom-headers": References a ConfigMap containing specific headers to pass to the backend.- Security Reason: Often used to inject security headers (like
X-Frame-OptionsorContent-Security-Policy) or to strip dangerous headers sent by the client before they reach your application. I use custom headers to ensure ghost also has the real ip of the client without using a snippet.
- Security Reason: Often used to inject security headers (like
proxy-host: "www.fracturedarchitecture.com": Explicitly sets the Host header sent to the backend.- Security Reason: Prevents Host Header Injection attacks. By hardcoding the expected host, you ensure the backend isn't tricked into processing requests for domains it shouldn't be serving.
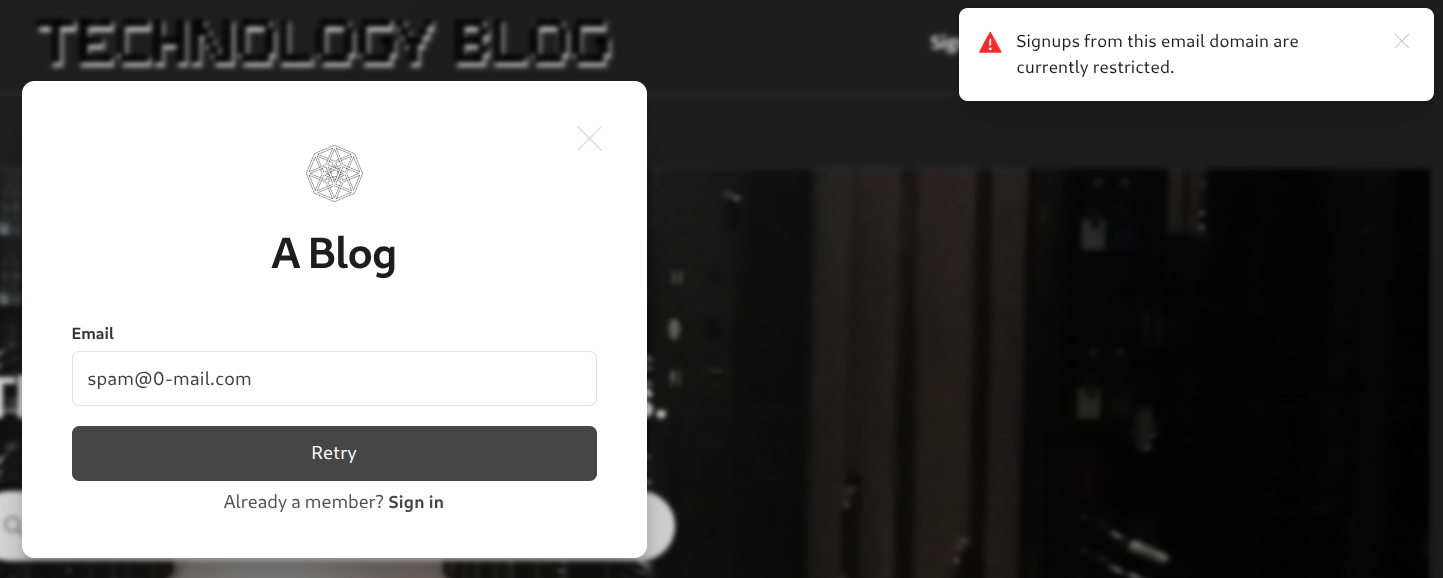
Ghost SMTP Signup Security
To prevent spammers from signing up to my site I have configured a denylist which ghost understands how to use. I wrote a custom python script which utilizes disposable-email-domains to generate the necessary ghost configuration file for blocking signups. No email in these domains will be allowed to signup. There are over 4K domains which are banned from signing up to my site. This reduces the likelihood of spammers signing up and that all users are real. It also limits my SMTP exposure and improves site reputation.
My ghost-config is in a configmap so this may not work for you but it will give you an idea of how to do it. You essentially want a script that can easily add new domains to this ghost config section.
"spam": { "blocked_email_domains": [ ] }
SSL Certificates
I use cert-manager paired with a ClusterIssuer to enforce a standardized encryption policy across my entire infrastructure. This setup moves TLS from a manual, error-prone task to a declarative security standard. By centralizing the issuance logic in a ClusterIssuer, I ensure that every service, regardless of its location in the cluster, follows the same rigorous validation protocols and security standards.
Implementing cert-manager specifically with Let's Encrypt allows me to move away from long-lived, static certificates toward a more secure, short-lived model. By using a trusted, automated Certificate Authority (CA), I can enforce modern encryption standards without the overhead of manual procurement.

Key security advantages include:
- Elimination of Certificate Expiration: The system automatically handles renewals well before the 90-day mark, removing the 'expired cert' vulnerability that often leads to service downtime or bypassed security checks.
- Infrastructure-as-Code (IaC) Security: Security is defined at the resource level. By adding a simple annotation to an Ingress, the system automatically provisions a trusted certificate, ensuring that no service is ever accidentally deployed over unencrypted HTTP.
- DNS-01 Challenge Validation: I leverage the DNS-01 challenge provider to prove domain ownership via API. This is significantly more secure than HTTP-01 as it doesn't require opening firewall holes or exposing temporary web paths for validation.
- Centralized Governance: Using a ClusterIssuer allows me to manage my Let’s Encrypt or private CA credentials in one secure location, reducing the risk of secret leakage across the cluster.
Google Analytics
Any legitimate user that does get past my inspection I track all user activity using Google Analytics. I know every page you have visited, ever click you have made, how much time you have spent on the page, what you did, how long you read a specific section and even who you are. Don't let that scare you. I'm trustworthy. lol
With my setup I should be able to safely handle at least 1M concurrent connections and prevent most DDoS attacks. Should be sufficient for a blog that will get maybe 10 views lol.
That's all for now! Hope you got something out of this. Always open for feedback and improving security posture.


